Ok, as promised, If I figured out enough of setting up a fresh ERPNExt server with Webmin, I would do a Step by Step set of instructions for how to do it.
So, here it is…
It is not the only way to do it and it may not even be the easiest way to get it done, but it was the way I figured out how to do it and it is reliably repeatable. I did this on a paid VPS host account with a KVM type VPS server. The hosting company doesn’t much matter as long as you are sure you can get ERPNext to run, then Webmin will also run.
Expect to take about 90 minutes to complete the whole process if you are a careful reader and can follow instructions pretty well.
As always… Hope this helps. ![]()
IMPORTANT:
For the purposes of this document we assume the user is familiar with using the command line prompt in their favorite linux distribution. You don’t have to be an expert, but at least familiar enough to do basic maintenance and edit files from the command line. We use the “nano” editor in this document, but you can use whatever is most familiar to you.
This document was made using ERPNext v10 as the starting point. It is also assumed the user is setting up their ERPNext server and WebMin control panel all at the same time. Therefore, the instructions here may or may not work on older versions of ERPNext already running on a server. You are responsible for your own server, so make a backup first or try this on a test server beforehand if you want to implement Webmin on an existing ERPNext installation.
Let’s Get Started:
Prerequisites:
-
You MUST already have a VPS server with at least 1gb of swap space as well as enough RAM memory and disk space to support your ERPNext installation.
-
You need a registered URL (like mybusiness.com) and you will need to have access to setting up the DNS records for your new URL. (we use GoDaddy for URL’s because it is so easy to manage the DNS records). Do NOT start this process unless you have registered URL to use.
-
You will also need a basic single page website to post to the public. You can use something like MS Word or the free version of LibreOffice to generate a document to use for your web page. Just save the document as html instead of a doc file.
-
You must have a SSH client software to access the server until you get Webmin running. There are many choices for SSH clients. Here we use Putty because it is a free and GPL licensed SSH client that is available for both Windows and Linux OS
Prepare the Server for ERPNext
In this case we are using a server configured with the basic Ubuntu version 16.04. The first thing to do is prepare the server with the most recent updates and generate the users you will need to operate everything.
-
To bring your new server up to the latest versions of all important packages, log into the server as root user and execute the following commands:
apt-get update apt-get upgrade -
Install the missing packages ERPNext will require
apt-get install python-minimal apt-get install build-essential python-setuptools -
Add the users you will need for Webmin and the ERPNext installation point. ERPNext is always installed in a user account. The default user account for ERPnext is “frappe” but you can use any account on the server (except root).
adduser [username] usermod –aG sudo [username] -
Reboot the server so all of the updates done earlier are used for all future work.
rebootThis will force the server to reboot and your connection to the server will be lost if you are using a SSH client like Putty so close the command window.
Install ERPNext
-
Using your SSH client, log into the server as the user you created in the last step and execute the t commands need to start the ERPNext easy install script. You can find these steps listed under the Easy Installation section located HERE.
wget https://raw.githubusercontent.com/frappe/bench/master/playbooks/install.py sudo python install.py –production –user [username] -
At some point during the install process you will be asked to supply and verify an Administrator password for the MariaDB SQL database and the Administrator password for the Administrator user in ERPNext. Please type carefully and write these passwords down somewhere so you do not forget them.
-
When the ERPNext system install is completed, leave the SSH window open, you will need it again very soon. Now open a browser and put the IP Address of your VPS server in the address bar. At this point you should be presented with the ERPNext login screen.
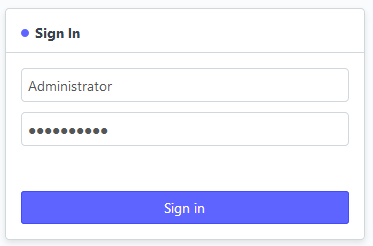
Type “Administrator” into the username box and the password you created for the ERPNext Administrator in the password box the click “Sign In”
-
The ERPNext setup wizard will step you though setting up the rest of your initial information to get the system running. It is important to complete this step before trying to do anything that follows here.
-
Log out of ERPNext and close the browser so we can safely make changes at the server command line.
Assigning a URL to ERPNext server
While you can easily create an “A” record in the DNS records list for your URL to point to the IP address of the server, it is better to configure ERPNext to be a DNS Multitenant server. This is actually a requirement if you want to get a SSL certificate for it.
This is where you have to do a little planning. If you only have one URL to use, then it is probably best to use a sub-domain to play the part of the ERPNext server and leave the core of the domain name open to be a website for your business.
In this example we will use one of my GoDaddy accounts to demonstrate.
The main website will be [mybusiness.com]
The ERPNext site will be [erp.mybusiness.com]
Log into your URL host account (in my case GoDaddy) and edit the first “A” record to point to your new VPS Host IP Address.
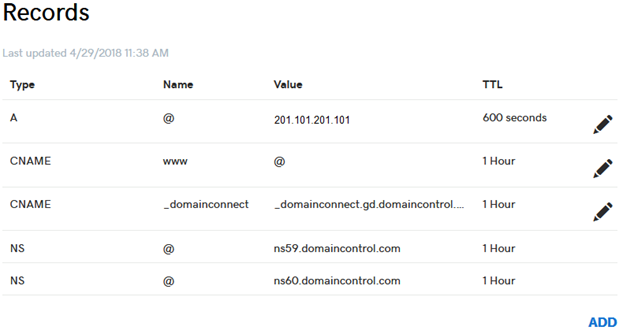
Obviously, the IP Address depicted here is fake, but it is a representation what yours may be.
-
You will want to edit the IP Address value to match the address of your VPS server
-
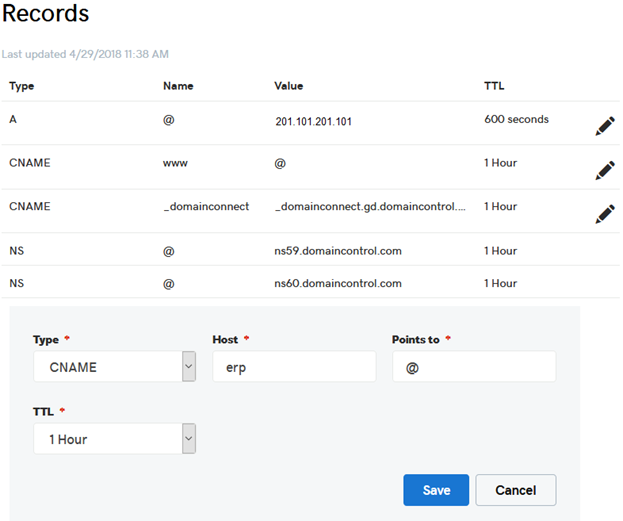
Next you will want to ADD a record to make a sub-domain for your ERPNext system
In the GoDaddy example, you would click on the blue “ADD” link in the bottom right corner to create a new record. It will look like this:
-
Set the “Type” of record to CNAME
-
In the “Host” box type the first part of the subdomain name. So for erp.mybusiness.com you would only type “erp” into the Host box
-
In the “Points to” box place the @ symbol. It is shorthand for “mybusiness.com”
-
The “Save” the record.
-
Now log out of your URL host site and close the browser.
Configuring ERPNext to handle the URL
Now that the DNS records are setup, it is time to make ERPNext look for the specific traffic coming into the server to use access the system.
-
Go back to your SSH client window and change your point of reference to the directory where ERPNext is installed
cd ~/frappe-bench -
In order for ERPNext to recognize traffic sent to it, it must be able to accept traffic to your new [erp.mybusiness.com] URL. That means we have to tell ERPNext to start watching for specific traffic and not just anything coming into the IP Address of the server. ERPNext has a feature specifically for this. It was designed to allow a single ERPNext server to host several complete and separate ERP system from the same installation. This feature is called DNS Multitenant and it needs to be turned on in order for the proper traffic detection to be working even if you only to intend to host a single ERPNext system. So execute the following commands:
bench config dns_multitenant on bench setup add-domain --site site1.local [erp.mybusiness.com] sudo service nginx reload -
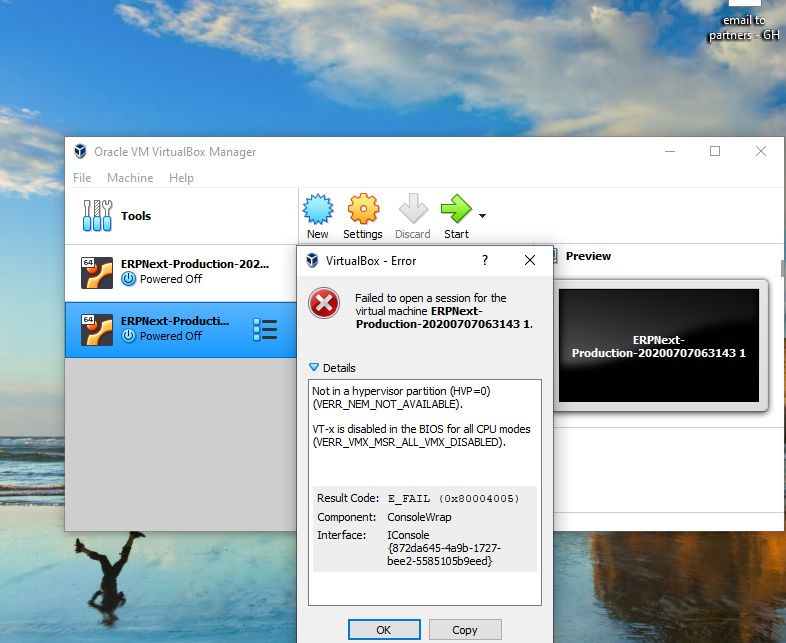
Now you can test if this worked by opening a fresh browser and typing your new ERPNext site name into the address bar (for example erp.mybusiness.com) and you should be taken to the ERPNext login screen. Likewise, if you type the IP address of your server into the address bar, it should now show an error screen. This is exactly what we want. Close the browser and let’s continue.
Setting up Lets Encrypt SSL certificate for your new ERPNext server
Most modern web browsers alert you to when the site you visit is not secured with encryption. ERPNext by default is not secured, so it is up to you to get a SSL Certificate. Instead of purchasing one from your VPS hosting company, just use Lets Encrypt to create your own. ERPNext even has a special script to do this for you.
-
Go back to your SSH window in the frappe-bench directory and type the following command:
sudo -H bench setup lets-encrypt site1.local --custom-domain [erp.mybusiness.com]
Answer Y to all questions allow the operation to continue
At some point it will ask you for an email address to send alerts, please enter your email address so you can be notified when it is time to renew your certificates.
-
When the certificate installation is completed, open a fresh browser and in the address bar type in your ERPNext URL (for example “erp.mybusiness.com”) and you should now see the ERPNext login screen again> The difference this time is the “https” at the beginning of the address. You now have a valid SSL certificate for your ERPNext server.
Setting up for the Webmin Control Panel
Now that you have a valid and running ERPNext server, it is time to install the Webmin control panel. In order to do this you will need a valid website and URL. When ERPNext was installed, part of the package line-up was the nginx web server. It has been highly configured to support all of the special need of the frappe framework and ERPnext. However, with a little bit of knowledge about how nginx works and a little bit of editing, it can support both a standard website as well as the ERPNext server. So let’s learn a little bit about how nginx works.
In it’s native form, a freshly installed nginx package uses all the standard directory trees that most any other webserver also use. In the case of nginx the default directory for you to load all of your website files is “/var/www/html”
When the install script for ERPNExt installed nginx it maintained the same default directory tree, but it also added a special configuration file to force the webserver to look for all of the website information in the home directory of the user responsible for the ERPNext server. By default that would be the “frappe” user, but if you follow our instructions it would be what ever user you created for installing ERPNext. So that would be “/home/[username]/frappe-bench/sites”
Since all of the default nginx website directory structure is also in place (just not used), we can make a few edits to have that work as our “mybusiness.com” website and also provide a URL for Webmin. We are going to need this part to work before we install the Webmin control panel.
Nginx uses a config file to tell it where to find everything. Webservers are normally defined in this file using a syntax called “server blocks” and by using server blocks we can open up nginx to host your business website. The file that would contain these server blocks is normally located at “/etc/nginx/nginx.conf” but if you were to look at the very last line of that file you can see that the developers at frappe have added a line the says “include /etc/nginx/conf.d/*.conf” and that means you have to look at the configuration files in this new directory to tell what is going on. Inside the “/etc/nginx/conf.d/” directory there is only one additional configuration file called “frappe-bench.conf”
In order to open up the ability to run a standard website from nginx, we are going to have to add a new directory to the nginx directory tree and edit the file “frappe-bench.conf” so close all browsers and go back to your SSH window.
-
Create the directory for your business website [mybusiness.com]
sudo mdkir /var/www/mybusiness.com (use your URL for directory name) -
If you created a single page website as instructed at the beginning of this document, then it is now time to upload it to your server and copy it to this new directory. (Filezilla is a free to use client for uploading files to your server if you do not already have one) Upload the file to your user directory, then execute:
sudo cp /home/[username]/[filename] /var/www/[mybusiness.com]/index.htmlIn the above case [filename] is whatever name you gave your html file when you created it and [mybusiness.com] gets replaced with whatever you named the directory in the previous step.
Now that the directory for the web page is in place and the webpage if copied there, it is time to edit in the server block to make your website work and provide a reference point for Webmin. Go back to your SSH window again and do the following:
-
Make sure you are at your home directory so type “cd ~”
-
Open frappe-bench.conf in your editor (in our example we use the nano editor
sudo nano /etc/nginx/conf.d/frappe-bench.conf -
Once it is open in the editor, go to the very end of the file and add the following lines:
server { listen 80; server_name mybusiness.com; root /var/www/mybusiness.com; } (Remember to replace “mybusiness.com” with your URL) -
Once the lines are added, save the file then execute the following command:
sudo service nginx reload -
Open a fresh browser and type the URL of your business website and hit enter. This should now take you to the single page website you made and placed in the nginx directory structure to act as a place holder website.
-
If the above setps worked and you can see your website, then you are ready to install the Webmin control panel. If it did not work, then you must go back and review your steps up to this point to see where you might have made an error. When the website works, you can move on to the Webmin installation.
Installing Webmin Control Panel
Now that ERPNext is running and you also successfully opened nginx up to run a regular website, it is time to install Webmin. There are several preliminary steps that need to be made before we can actually install the program. We need to tell Ubuntu (or your linux distro) about where to find the sources to install Webmin and keep it updated.
(These instructions were adapted from HERE to suit our purposes. It is a good reference on how to setup a Webmin control panel on any server.)
-
Open the following file in your editor
sudo nano /etc/apt/sources.list -
Go to the very bottom of the file and add the following line:
deb http://download.webmin.com/download/repository sarge contrib -
Save the file in the editor
-
Next we have to add the Webmin PGP key so that your server will trust the new repository. So execute the following commands:
wget http://www.webmin.com/jcameron-key.asc sudo apt-key add jcameron-key.asc -
Now we have to update the list of packages to include the Webmin repository
sudo apt-get update -
Now we can install Webmin
sudo apt-get install webmin -
When Webmin finishes installing, we still have one more thing to do before we can log into the control panel. Webmin uses port 10000 to allow access to the control panel. We have to tell the default firewall in Ubuntu to open that port for us.
sudo ufw allow 10000
That should finish the installation steps, so let’s log into the Webmin control panel for the first time and get it ready to use.
-
Open a fresh web browser and type the IP address of your VPS server followed by the port 10000. It should look something like this:
https://201.101.201.101:10000 (use your IP address not this example address) -
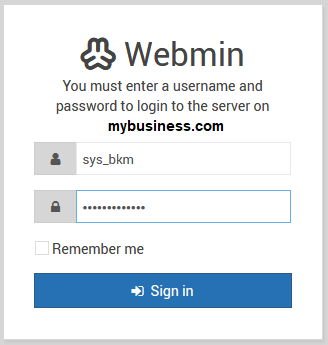
Your browser will likely complain that it is an unsafe site. Do whatever is necessary to allow the exception for this address. It is the only time you will need to do this. You should be presented with the login screen for Webmin
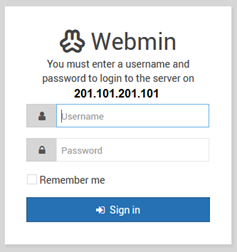
-
Type in the same username and password you use in the SSH client to login.
-
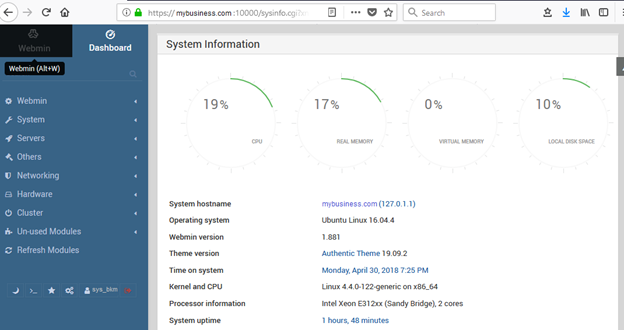
Once you have successfully logged into the Webmin control panel you should be presented with a screen like this:
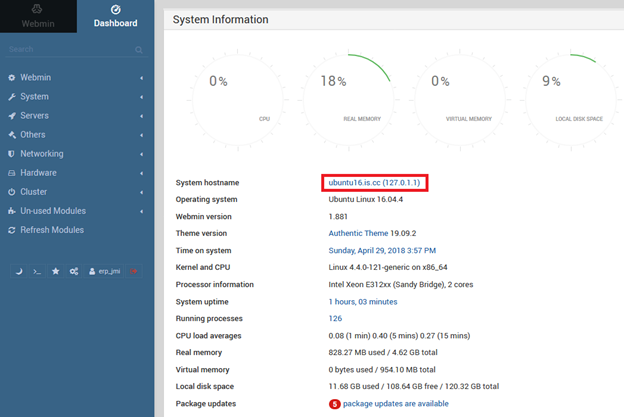
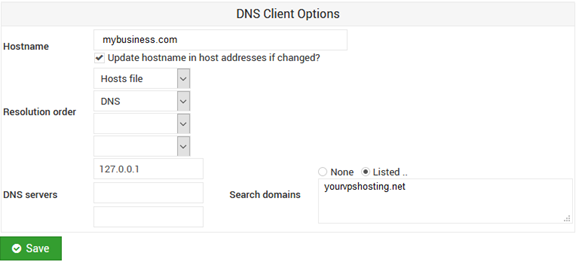
In the above screenshot I have outlined in red the first change we must make to the Webmin control panel in order to have it work properly. Click on the link for the “System hostname” and in the next window change the “Hostname” to your URL like the screenshot below and Save.
Once you have changed the name of the server to match your URL, it is time to setup a secure SSL certificate for the Webmin control panel. Please note that since we have already used the Lets Encrypt native client to setup SSL certificates for the ERPNext specific URL’s we will not be able to use the automated Lets Encrypt service from Webmin. The way ERPNext installs and uses the Lets Encrypt certificates interferes with the automated feature built into Webmin. Hopwver that should not stop you from using Webmin. There is another way to get your free Lets Encrypt certificates. It just requires a little more effort.
-
Open a fresh web browser and go to https://zerossl.com/ and click the “Online Tools” button followed by the “Start” button
-
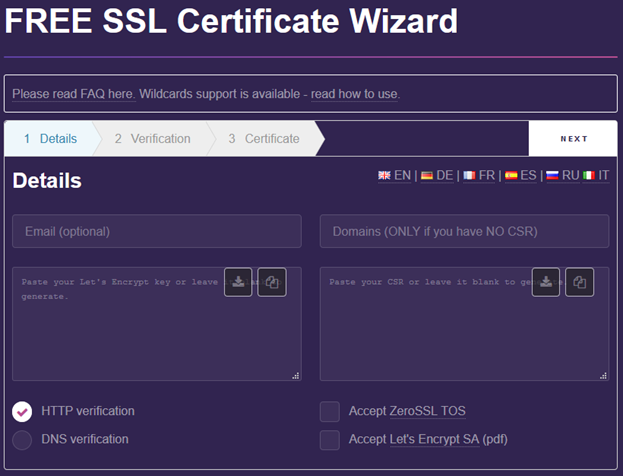
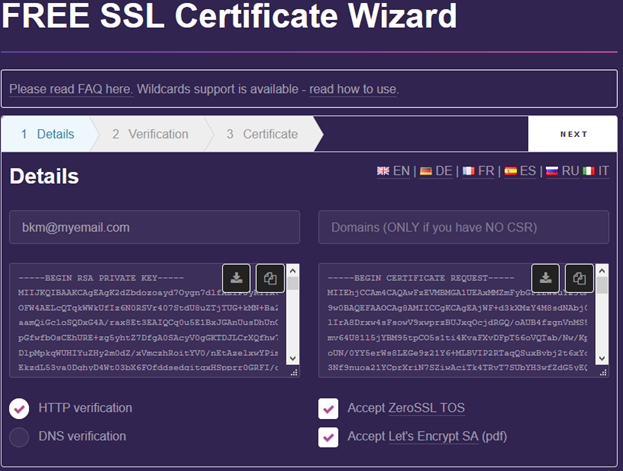
In the screen below fill in the following items and click the Next button (top right)
Email – enter the email address where you want to receive renewal notices
Domains – enter the domain name here (like mybusiness.com)
Click the two “Accept” boxes in the lower right side then hit Next
-
The box on the right side will fill up with your actual certificate (and your URL will disappear). Click the download button inside the box to save the file to your PC.
-
Click Next again and the left box will fill up with your account key. Save this file too!
Your screen should now look something like this:
-
The two files you saved are important. The first one was the actual SSL certificate and the second one was the account identification key you will need in order to renew your certificates every 90 days.
-
Before proceeding to the next step in this process you will need access to your file transfer utility again. In my case that was “Filezilla” so my next few instructions will be directly related to the Filezilla user interface.
-
Access your server with Filezilla (or your favorite file xfer utility) and log in using your server root user and password.
-
Navigate your service side to /var/www/mybusiness.com (or whatever your site is)
-
In FIlezilla, right click on your target directory and select “Create directory and enter it” then add the following directory: /.well-known/acme-challenge/
-
Now go back to the certificate screen in you r browser and hit the Next button again
You will be presented with the following screen:
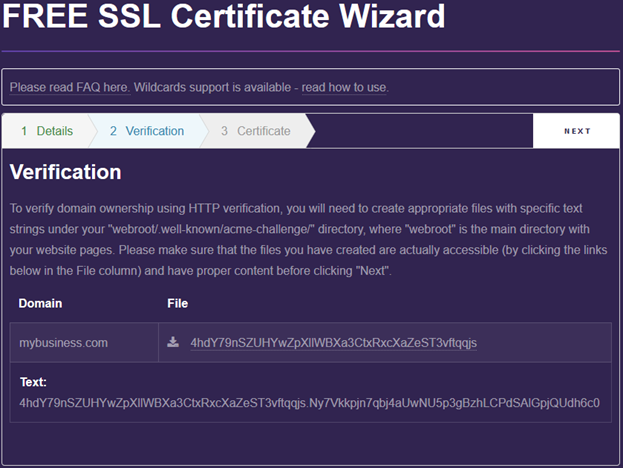
Don’t worry about the contents of the screen in the picture. The data in this case is fake and only for this demonstration purpose.
-
First you need to click on the download icon next to the long file name in the “File” box. Save the file somewhere it is easily accessed. You will be sending this file up to the server with your file xfer utility.
-
From Filezilla (or your favorite file xfer utility) navigate the local PC side to the location of the file you just downloaded from the SSL generator site. In Filezilla, right click on the file name and select upload. The file will then be moved up to the server in the directory you created there just for this test.
-
When the file is uploaded, come back to the zerossl.com screen and click on the file name in the “file” box. If you get a prompt to download the same file (this time from your website) then you have successfully set yourself up for the final step.
-
WARNING If clicking on the file name did NOT prompt you to download the file from your own site, then you MUST close the the SSL site and start the process over again. If the download test failed then your server is not ready for the SSL Certificate step.
-
If your file did download from your site, then it is time to hit the Next button again in the SSL generator site.
You should now be at the final screen in this process. The zerossl.com site has generated everything you need to put a certificate on your Webmin site.
-
Download both files displayed for you on this last page. One is the domain certificate, and the other is the domain key that will allow the certificate to be registered on your server. Save these file in a text format so they can be copied in the next few steps.
-
Exit and close the browser from the zerossl.com site. We will not need anything ese from there for now.
-
If it is not already open, then log into your Webmin Control Panel using https:// and your IP address followed by the :10000 port.
-
Click on the Webmin link on the left side of the screen and select Webmin Configuration then click the icon for “SSL Encryption” and select the “Upload” tab at the top.
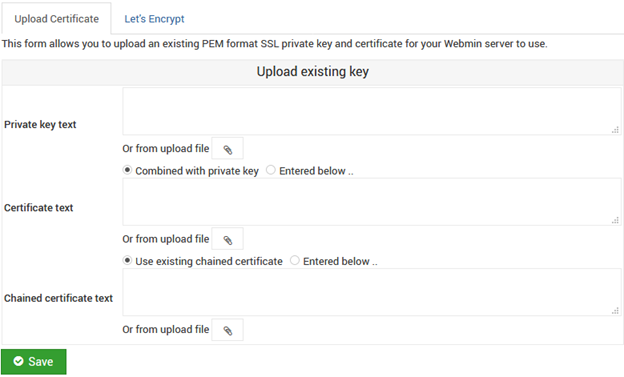
-
Copy the complete contents of the “domain-key.txt” file you got in the last step of the SSL generator and paste it into the top “Private Key” box.
-
Copy the entire contents of the “domain-crt.txt” file also from the last step and paste it into the second box labeled “Certificate text” and click the “Enter below” radio button just above the box. Then hit the green “save” button.
If all went well, then you will receive a brief success message and you Webmin site is now using SSL encryption. You will have to close your Webmin page at this time because it will no longer function under the last login.
-
Close the Webmin browser and open a fresh browser. In the address bar type:
https://mybusiness.com:10000 (replace mybusiness.com with your site name).
.Log into your Webmin server with your “Linux” username and password
.
.
.
.
You will now notice that you have the nice green lock symbol next to your web address in the address bar. Everything is now done for Webmin. There are other things I wanted to get into here but this is already a long document and you should be able to figure out most of the Webmin Control Panel out for yourself.
Conclusion
There are some things you need to know now that you have completed this process.
- You have a working ERPNext server with a Webmin server both with SSL certs.
- You have a standard website for your business if you choose to use it
- Due to a problem with Webmin, you do NOT have a SSL cert for your standard website. This is something that may be remedied later, but I am not going to spin my wheels on that at the moment.
- At the very bottom of the left column of Webmin menu there is a tiny row of shortcuts.
- The 1st icon lets you change the screen to a darker shade for easier viewing
- The 2nd one is a command line interface so you don’t need Putty
- The 3rd one is Favorites links, and the 4th is theme management
- The Last one is the “Exit” link to sign out
Have Fun!!!